![]()
Download Article
An easy tutorial for getting started with your scientific calculator
![]()
Download Article
- Understanding Calculator Basics
- Practicing Functions
- Graphing an Equation
- Video
- Expert Interview
- Q&A
- Tips
- Warnings
|
|
|
|
|
|
|
This wikiHow teaches you how to master the basics of using a scientific calculator. This article will cover the basic operation of the calculator, using functions, and graphing. There are a lot of features to learn about, but getting the basics down will allow you to access pretty much any function! Scientific calculators are must-have tools for math classes like Algebra, Trigonometry, and Geometry. Compared to basic calculators, scientific calculators have more advanced math operations.
Things You Should Know
- Press the 2ND or SHIFT key to access secondary functions.
- If you’re using trigonometry functions, make sure you’re in the correct mode for the problem (radians or degrees).
- Press the Y= button for graphing equations, then GRAPH to see the results.
-

There are several functions on the calculator that will be essential for Algebra, Trigonometry, Geometry, Calculus, and more. Find the following functions on your calculator:
Basic Operations[1]
Operation Function + Addition — Subtraction (not negative) x Multiplication (There is often an x key for variables as well) ÷ Division ^ Raise to the power of yx y to the power of x √ or Sqrt Square root ex Exponential sin Sine function sin-1 Inverse sine function cos Cosine function cos-1 Inverse cosine function tan Tangent function tan-1 Inverse tangent function ln Log to the base of e log Log base 10 (-) or neg Denotes negative number () Parentheses for denoting order of operations π Inserts pi Mode Switches between degrees and radians -
While the bulk of the most common functions will have their own keys (e.g., the SIN key), things like inverse functions (e.g., SIN-1) or less-common functions (e.g., the square root √) will be listed above other keys.
- Some calculators have a «Shift» key instead of a «2ND» key.
- In many cases, the color of the «Shift» or «2ND» key will match the color of the function’s text.
Advertisement
-
Whenever you type a left parenthesis, you must close it with a right one; similarly, if you type a total of five left parentheses, you’ll have to close them with five right ones.
- This is important when entering larger calculations, as leaving out a parenthesis can cause the equation to return a far different answer than you should have.
-
You can change between displaying values in terms of degrees (fractions of 360) or radians (decimals using pi as the basis) by pressing the MODE key, using the arrow keys to select RADIANS or DEGREES, and pressing the ENTER button.
- This is important when performing Trigonometry calculations. If you notice that your equations are returning decimal values instead of degrees (or vice versa), you’ll need to change this setting.
-
Saving your results and pulling them back later is an essential skill for dealing with longer problems. There are a couple of different ways to use stored information:
- After completing a calculation, the last answer is automatically stored. You can perform another calculation on that answer by tying in the next operation. For example, if you just entered 2^4 and pressed ENTER (which equals 16), typing in -10 and pressing ENTER would subtract 10 from the solution (meaning it would be 16 — 10).
- Use the Answer function to recall the last displayed answer to an equation. When you press the Ans key, the last answer from the previous calculation will be added into your equation.
- Press STO after retrieving your preferred answer, press ALPHA, select a letter, and press ENTER. You can then use that letter as a placeholder for the answer you stored.
- Some scientific calculators allow you to retrieve previous answers by pressing the up arrow button. When you find the answer you were looking for, press ENTER to place that number in your current equation. Note that there’s usually a limit to how many previous answers are stored, so you can only use this method for recent calculations.
-
If you ever need to exit a menu or remove several lines’ worth of equations from the calculator screen, you can press the AC or CLEAR button to do so.
- You can also press the 2ND or Shift key and then press whichever button has «QUIT» listed over it (in most cases, this is the MODE key).


Advertisement
-
Test out the button order on an easy and quick problem. For example, you might try taking the square root of 9; you should already know that the answer will be 3, so this is a great tip to use in the middle of a test if you forget which order you’re supposed to be pressing buttons:
- Find the square root (√) symbol.
- Either press the square root key or press the SHIFT or 2ND button and then press its key.
- Press 9
- Press ENTER or = to solve the equation.
-
In most cases, you’ll do this by entering the first number, pressing the carrot (^) button, and entering the number to which you want to raise the first number.
- For example, to calculate 22, you would type in 2^2 and then press ENTER or =.
- To ensure the number order is correct, try performing a simple test, such as 23. If you get 8 as the answer, then you did it in the right order. If you got 9, then you actually did 32.
-
When you are using the SIN, COS, or TAN functions, you will have to keep in mind two different things: the order of the button presses, and radians versus degrees. These scientific calculator functions are commonly used in Algebra.
- Perform a simple SIN function with an easy to remember answer. For example, the sine of 30° is 0.5.
- On a scientific calculator, to find the sine of 30° for example, you type in 30, then press SIN to get 0.5. If you got a different answer, it probably means that your scientific calculator is not in degree mode. To put it in degree mode, look for a button that says DRG which stands for Degrees, Radians, and Gradients. If you push the DRG button several times, you will see that the mode in your view screen will change between degrees, radians, and gradients. Push the DRG button until you see degrees or DEG indicated in the view screen. Once you have degrees in the view screen, then type in 30 then press SIN and you should get 0.5.
-
Things can get a bit more complicated when you start entering longer equations into your calculator. You will need to take order into consideration, and will often make use of the () keys. Try entering the following equation into your calculator: 3^4/(3+(25/3+4*(-(1^2))))
- Note how many parentheses are necessary to keep the formula intact. Proper parentheses use is essential to successfully using the calculator.
- Most calculators follow PEMDAS (parenthesis, exponent, multiplication, division, addition, subtraction), but using parentheses is the most sure way to correctly calculate the equation.
- After you’re done calculating for the day, you can try downloading games onto your calculator.
-
While things like SIN, square roots, inverse exponents, and pi are often either represented by keys or secondary text above keys, you can find more advanced functions (e.g., factorials) in the MATH menu. To use the MATH menu, do the following:
- Press the MATH button.
- Use the up and down arrows to scroll up and down through a category of equations.
- Use the right and left arrows to scroll right and left through the different categories.
- Press ENTER or = to select an equation, then enter the number or formula to which you want to apply the equation.
- Press ENTER or = to calculate the whole equation.


Advertisement
-
1
Understand that not all scientific calculators allow graphing. If your calculator doesn’t have a Y= button on it, you most likely can’t use the calculator to graph a standard «y=mx+b» (or similar) plot.[2]
- You can check your calculator’s documentation to determine whether or not it supports graphing, or you can just look for the Y= button near the top of the calculator’s keypad.
-
2
Press the «Y=» button. It’s typically at the top of the calculator’s keypad. Doing so brings up a list of Y values (e.g., «Y1», «Y2», etc.) which represent different equations.
-
3
Enter your equation. Type in the equation (e.g., 3x+4), then press ENTER or =. You should see the equation appear to the right of the «Y1» value.
- For the X part of the equation, you’ll press the X,T,Θ,n key (or similar).
-
4
Press GRAPH. This button is usually at the top of the calculator’s keypad.
-
5
Review the results. After a moment, you should see the graph’s line appear on-screen. This will show you the curve of the graph and its general position.
- You can view the graph’s individual points by pressing the TABLE (or Shift/2ND and then GRAPH) button and then scrolling through the resulting table.
- You can also use the graphing function to find minimum and maximum points on your curve.
-
6
Press WINDOW to change the graph settings. This will open an options menu where you can alter the x and y minimum and maximum values, change the scale of the axes, and more.
- You can press ZOOM to see a list of automatic zoom options. For example, ZoomFit will adjust the graph to show the entire curve.
Advertisement
Add New Question
-
Question
How do I square something?

Type the number you want to square and then press the «x2» button (small 2 on upper right of the x). If the calculator doesn’t have such a button, you just have to multiply the number times itself (e.g., 13×13).
-
Question
What are the functions of a calculator?
A scientific calculator can calculate angles using sine, cosine, and tangent. It can change the a number from decimal to hexadecimal or octal. It can also solve equations. Some scientific calculators allow you to store your own formula as well. Most are capable of calculating fraction, index and root.
-
Question
How do I use the log function on a scientific calculator?
The log is the inverse function of raising a number by a power. It takes the input number (base) and the output number and calculates which number the base must be raised to the power of to produce the output — e.g. x^n=y —> logy(x) = n (the y would be given in subscript) and this is stated «Log base y of x equals n.»
If you have a modern calculator, there should be a log button with two blank rectangles allowing you to input the base and the output to find the power. On an older calculator, however, you will need to use a «log-law» to convert it into an equation involving the log function (meaning log base 10). Do this by typing logy/logx to give answer n.
See more answers
Ask a Question
200 characters left
Include your email address to get a message when this question is answered.
Submit
Advertisement
Video
-
Every scientific calculator is laid out differently, so take some time to familiarize yourself with where everything is. Refer to the manual if you can’t find a specific function that you know should be there.
Thanks for submitting a tip for review!
Advertisement
-
Older scientific calculators (e.g., ones which can’t graph or type) may not be able to access some of the advanced functions such as the MATH menu.
Advertisement
![]()
Thanks for reading our article! If you’d like to learn more about math, check out our in-depth interview with JohnK Wright V.
References
About This Article
Article SummaryX
To operate a scientific calculator, locate the primary functions, like square root, sine, and tangent, since you’ll be using these frequently. Additionally, familiarize yourself with the secondary functions above the primary keys, which can be accessed by pressing the “Shift” or “2ND” key. When dealing with longer problems, use the answer function to recall the last displayed answer to an equation. If you need to clear the screen, press the “Clear” button near the top of the keyboard. To learn how to switch between degrees and radians on a scientific calculator, keep reading!
Did this summary help you?
Thanks to all authors for creating a page that has been read 546,955 times.
Reader Success Stories
-

«Quick, concise, and to the point. Found exactly what I was looking for easily. Will continue to use! Good stuff. »
Is this article up to date?
До начала работы нажмите клавишу включения ON/C, после чего на дисплее “0”.
Клавиши калькулятора (см. инструкцию на английском языке):
1. Клавиша выключения — когда нажата эта клавиша, калькулятор выключается.
Калькулятор автоматически отключается приблизительно через 8 мин. после последнего нажатия клавиш для исключения разряда батарей.
2. Включение и очистка экрана.
Нажмите эту клавишу для включения калькулятора. Он готов к работе. Нажимая эту клавишу во время работы, Вы очищаете экран и память.
2ndF STAT — Активизируется статистическая программа.
Когда установлен режим статистических вычислений, загорается символ STAT, при этом включается режим вычисления статистических значений, память и экран очищаются.
В режиме статистических вычислений не действуют операции с памятью, преобразования координат, вычисления с комплексными числами, бинарные и тому подобные функции.
После введения очередного значения данных нужно нажать клавишу М+ (DATA). Вывод статистики – путем нажатия клавиш:
n – число введенных значений, среднее значение,
S – стандартная девиация с параметром n-1, а также в сочетании с клавишей 2ndF — åx (сумма значений), åx2 (сумма квадратов), s (стандартная девиация с параметром n) и СD (корректировка значения).
3. 2ndF — клавиша включения режима вычисления второй функции
4. Клавиша преобразования Степень/ Радиан/ Град
Используется для тригонометрических вычислений, изменяет угловой режим.
режим DEG — ввод и вывод с десятичной степенью
режим RAD — ввод и вывод в радианах
режим GRAD — ввод и вывод в градах.
5. Клавиша вычисления гиперболических функций и обратных к ним (arc).
6. Клавиши тригонометрических/ обратных тригонометрических функций.
7. Изменение формата экрана/ табуляция
F<->E — если результат вычислений в формате с плавающей точкой, нажатие клавиши переводит его в систему научной записи.
2ndF TAB <цифра> — для определения числа десятичных цифр после запятой в результате вычислений.
2ndF TAB · — возврат к обычному представлению.
8. Очистка ввода/ Факториал
СЕ — очищает неправильно введенное число
2ndF n! — вычисляет факториал.
9. Степень/ Минуты/Секунды
+DEC 2ndF +DMS — перевод степень/минуты/секунды в десятичный вид
D — шестнадцатеричное число D.
10. Натуральный логарифм/антилогарифм/ шестнадцатеричное E
11. Десятичный логарифм/антилогарифм/шестнадцатеричное F
12. Клавиша ввода вещественного числа/ преобразования координат.
Используется при вводе вещественной части комплексного числа и когда вызывается вещественная часть комплексного результата вычислений.
2ndF . — перевод декартовых координат в полярные.
13. Клавиша ввода мнимой части комплексного числа/ преобразования координат
Используется при вводе мнимой части комплексного числа и когда вызывается мнимая часть комплексного результата вычислений
2ndF . — перевод полярных координат в декартовы.
14. Стирание справа/ Режим комплексных чисел
-> Пример. 123456 -> -> 123.
2ndF — используется для перехода в режим комплексных чисел.
15. Ввод экспоненты/ Пи и режим шестнадцатеричных чисел
EXP — ввод числа в научной записи
2ndF p — ввод числа пи
А — шестнадцатеричное число А.
16. уx / / шестнадцатеричное число В
Вычисляет степень числа
2ndF — вычисляет корень степени Х из Y
B — шестнадцатеричное число B.
17. Квадратный корень/ кубический корень/ шестнадцатеричное число С.
18. Квадрат числа/ обратное число.
19. Клавиша открытие скобки/ обмен
Открывает скобку
2ndF — обмен числа на экране с числом в рабочем регистре.
20. Клавиша закрытие скобки/ статистические вычисления
Закрывает скобку.
В режиме статистических вычислений
Выдает номер вводимого числа
2ndF — используется для вычисления суммы данных.
21. Клавиши цифр — для ввода цифр от 0 до 9.
22. Деление / Переход в двоичный режим
2ndF — переводит число в число с основанием 2.
23. Умножение/ Переход в восьмеричную систему
2ndF — переводит число в число с основанием 8.
24. Минус/ Шестнадцатеричный режим
2ndF — переводит число в число с основанием 16.
25. Плюс/ Переход в десятичный режим.
26. Запись в память/ статистические вычисления
Записывает число в память и хранит там.
В режиме статистических вычислений используется для вычисления среднего значения
2ndF — вычисление суммы квадратов.
27. Вызов из памяти/ статистические вычисления.
В режиме статистических вычислений используется для вычисления стандартного отклонения множества чисел.
2ndF — используется для вычисления стандартного отклонения выборки данных.
28. Ввод в память с плюсом/ DATA CD.
В режиме статистических вычислений
DATA — используется для ввода данных
2ndF СD — исправление ввода (удаление)
29. +/- — изменение знака.
30. Десятичная точка/ случайное число
2ndF RND — генерирует случайное число в диапазоне от 0.000 до 0.999.
31. Клавиша равно/процент.
(1) Формат экрана
— плавающая точка, нормальный экран
— система научной записи
(2) Символы
— — минус — появляется для отрицательных чисел
М — появляется, когда число хранится в памяти
Е — символ ошибки или переполнения
2ndF — появляется при действии 2-й функции
HYP — появляется при вычислении гиперболической функции
DEG — появляется в режиме вычисления степени
RAD — появляется в режиме радианов
GRAD — появляется в режиме градов или показывает, что результат в градах
( ) — символы скобок
BIN — индикатор двоичного режима
OKT — индикатор восьмеричного режима
HEX — индикатор шестнадцатеричного режима
CPLX — индикатор режима комплексных чисел
STAT — индикатор режима статистических вычислений
(3) Экран позволяет выводить числа от 0.000000001 до 9999999999.
Совет пользователя: «Нажмите 2ndF, затем TAB (функция сидит на клавише F-E), затем десятичную точку (.) Таким образом отключится режим округления.»
Пусть мы знаем модуль (длину радиус-вектора) $r$ и аргумент (величину полярного угла) $theta$ некоторого комплексного числа, и хотим найти действительную и мнимую составляющие этого числа. Поступаем следующим образом.
Вводим длину радиус-вектора $r$, жмём
$stackrel<to r theta><fbox>$, затем величину полярного угла $B$, жмём $stackrel<to xy><fbox>$, и, наконец,
$$
<fbox<2ndF>> stackrel<to xy><fbox>.
$$
Здесь так же единицы измерения угла зависят от режимов deg, rad и grad.
Кстати, функция кнопки $ stackrel<<rm CPLX>><fbox< $blacktriangleright$ >> $ — удаление последней введённой цифры.
Статистические функции
Чтобы работать со статистическими функциями, нужно включить режим stat:
$$
<fbox<2ndF>> stackrel<<rm STAT>><fbox>.
$$
На дисплее появится соответствующий знак. Все дальнейшие действия выполнимы лишь в режиме stat.
При работе в режиме stat используются три регистра. Мы обозначим эти регистры через $n$, $Sigma x$ и $Sigma x^2$.
После включения режима stat в каждом из регистров $n$, $Sigma x$ и $Sigma x^2$ хранится нулевое значение.
Если теперь набрать какое-либо число и нажать клавишу $stackrel<<rm DATA CD>><fbox>$, то произойдёт следующее:
- Значение в регистре $n$ будет увеличено на $1$;
- Значение в регистре $Sigma x$ будет увеличено на число, отображаемое на дисплее;
- Значение в регистре $Sigma x^2$ будет увеличено на квадрат числа, отображаемого на дисплее;
- Значение в регистре $n$ будет выведено на дисплей.
Таким образом происходит накопление статистических данных.
Чтобы увидеть содержимое регистра $n$, нажмите
$$
stackrel<fbox<)>>.
$$
Чтобы увидеть содержимое регистра $Sigma x$, нажмите
$$
<fbox<2ndF>> stackrel<fbox<)>>.
$$
Если набрать какое-либо число и набрать последовательность $<fbox<2ndF>> stackrel<<rm DATA CD>><fbox>$, то произойдёт следующее:
- Значение в регистре $n$ будет уменьшено на $1$;
- Значение в регистре $Sigma x$ будет уменьшено на число, отображаемое на дисплее;
- Значение в регистре $Sigma x^2$ будет уменьшено на квадрат числа, отображаемого на дисплее;
- Значение в регистре $n$ будет выведено на дисплей.
Так можно откорректировать введённые данные.
Предположим, что мы ввели $n$ (не путать с нашим условным названием регистра) чисел $x_1, . x_n$. Тогда у нас есть следующие исходные данные:
- Количество введённых чисел $n$ (в регистре $n$);
- Значение
$$
sum_^ x_i
$$
в регистре $Sigma x$; - Значение
$$
sum_^ x_i^2
$$
в регистре $Sigma x^2$.
Именно эти три величины используются статистическими функциями калькулятора.
Далее мы будем использовать символы $n$, $Sigma x$ и $Sigma x^2$ для обозначения значений в соответсвующих регистрах.
Работа с инженерным калькулятором
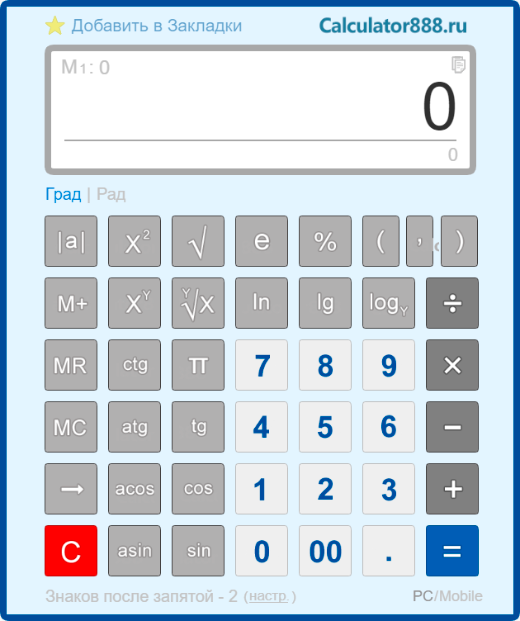
Калькулятор инженерный
Используйте инженерный калькулятор для сложных расчетов с применением тригонометрических функций. Команды вводятся с помощью мыши или клавиатуры.
Инженерный калькулятор позволяет производить сложные расчеты с применением различных тригонометрических функций: синуса, косинуса, тангенса, котангенса. Калькулятор позволяет возводить числа в степень, вычислять логарифм числа.
Основные команды (цифры, умножение, деление, сложение, вычитание, равенство, сброс) можно вводить как с помощью мышки, так и с помощью цифровой клавиатуры (верхней или боковой). Подробные инструкции по работе с инженерным калькулятором смотрите внизу страницы.
Функции стандартных кнопок
[ 0 ], [ 1 ], [ 2 ], . [ 9 ] — стандартные цифровые клавиши;
[ 00 ] — клавиша для ввода 2-х нулей;
[ → ] — удаление на дисплее последнего введенного знака;
[ +/- ] — изменение математического знака числа на дисплее на противоположный;
[ XY ] — возведение числа X в степень Y;
[ √ ] — вычисление квадратного корня;
[ + ] — сложение, [ — ] — вычитание, [ х ] — умножение, [ ÷ ] — деление;
[ % ] — вычисление процентов;
[ M+ ] — сохранение в памяти со знаком [ + ];
[ M- ] — сохранение в памяти со знаком [ — ];
[ MR ] — вывод содержимого памяти на дисплей;
[ MC ] — очистка содержимого памяти;
[ AC ] — сброс калькулятора включая память;
[ C ] — сброс калькулятора, без сброса памяти.
Ввод команд с компьютерной клавиатуры
Для работы с калькулятором можно использовать любые цифровые клавиши: как цифровые клавиши находящиеся сверху, так и отдельные цифровые клавиши находящиеся справа.
Для ввода равно можно использовать клавишу [ Enter ];
Для стирания последнего знака используется клавиша [ Backspace ] (клавиша со стрелкой);
Для ввода знака плюс используется клавиша [ + ] сверху или на боковой клавиатуре;
Для ввода знака минус используется клавиша [ — ] сверху или на боковой клавиатуре;
Для ввода знака умножения используется клавиша [ * ] на боковой клавиатуре;
Для ввода знака деления используется клавиша [ / ] на боковой клавиатуре;
Для сброса калькулятора можно использовать клавиши [ Esc ], [ Del ] на верхней клавиатуре или [ End ] на цифровой клавиатуре.
Примеры вычислений на инженерном калькуляторе
Вычисление квадратного корня числа 529: 529 [ √ ] . Результат — 23.
Возвести число 3 в степень 4: 3 [ X Y ] 4 . Результат — 81.
Вычисление процента от числа: 500 [ x ] 25 [ % ]. Результат — 125
Прибавление процента к числу: 500 [ + ] 25 [ % ]. Результат — 625
Вычитание процента из числа: 500 [ — ] 25 [ % ]. Результат — 375
Почему мы так решили? Наш онлайн калькулятор оперирует числами вплоть до 20 знаков после запятой, в отличие от других. Kalkpro.ru способен точно и достоверно совершить любые вычислительные операции, как простые, так и сложные.
Только корректные расчеты по всем правилам математики!
В любой момент и в любом месте под рукой, универсальный инженерный калькулятор онлайн выполнит для вас любую операцию абсолютно бесплатно, практически мгновенно, просто добавьте программу в закладки.
Всё для вашего удобства:
- быстрые вычисления и загрузка,
- верные расчеты по всем правилам,
- полный функционал,
- понятный интерфейс,
- адаптация под любой размер устройства
- бесплатно
- не надо ничего устанавливать,
- никакой всплывающей назойливой рекламы,
- подробная инструкция с примерами
Содержание справки:
Комплекс операций инженерного калькулятора
Встроенный математический калькулятор поможет вам провести самые простые расчеты: умножение и суммирование, вычитание, а также деление. Калькулятор степеней онлайн быстро и точно возведет любое число в выбранную вами степень.
Представленный инженерный калькулятор содержит в себе все возможные вариации онлайн программ для расчетов. Kalkpro.ru содержит тригонометрический калькулятор (углы и радианы, грады), логарифмов (Log), факториалов (n!), расчета корней, синусов и арктангенсов, косинусов, тангенсов онлайн – множество тригонометрический функций и не только.
Работать с вычислительной программой можно онлайн с любого устройства, в каждом случае размер интерфейса будет подстраиваться под ваше устройство, либо вы можете откорректировать его размер на свой вкус.
Ввод цифр производится в двух вариантах:
- с мобильных устройств – ввод с дисплеем телефона или планшета, клавишами интерфейса программы
- с персонального компьютера – с помощью электронного дисплея интерфейса, либо через клавиатуру компьютера любыми цифрами
Инструкция по функциям инженерного калькулятора
Для понимания возможностей программы мы даем вам краткую инструкцию, более подробно смотрите в примерах вычислений онлайн. Принцип работы с научным калькулятором такой: вводится число, с которым будет производиться вычисление, затем нажимается кнопка функции или операции, потом, если требуется, то еще цифра, например, степень, в конце — знак равенства.

- [Inv] – обратная функция для sin, cos, tan, переключает интерфейс на другие функции
- [Ln] – натуральный логарифм по основанию «e»
- [ ( ] и [ ) ] — вводит скобки
- [Int] – отображает целую часть десятичного числа
- [Sinh] — гиперболический синус
- [Sin] – синус заданного угла
- [X 2 ] – возведение в квадрат (формула x^2)
- [n!] — вычисляет факториал введенного значения — произведение n последовательных чисел, начиная с единицы до самого введенного числа, например 4!=1*2*3*4, то есть 24
- [Dms] – переводит из десятичного вида в формат в градусы, минуты, секунды.
- [Cosh] — гиперболический косинус
- [Cos] – косинус угла
- [x y ] – возведение икса в степ. игрик (формула x^y)
- [ y √x] – извлечение корня в степени y из икс
- [Pi] – число Пи, выдает значение Pi для расчетов
- [tanh] — гиперболический тангенс
- [tan] – тангенс угла онлайн, tg
- [X 3 ] — помогает возвести в степень 3, в куб (формула x^3)
- [ 3 √x] — извлечь корень кубический
- [F – E] — переключает ввод чисел в экспоненциальном представлении и обратно
- [Exp] — позволяет вводить данные в экспоненциальном представлении.
- [Mod] — позволяет нам вычислить остаток от деления одного числа на другое
- [Log] – рассчитывает десятичный логарифм
- [10^x] – возведение десяти в произвольную степень
- [1/X] — подсчитывает обратную величину
- [e^x] – Возведение числа Эйлера в степень
- [Frac] – отсекает целую часть, оставляет дробную
- [sinh -1 ] – обратный гиперболический синус
- [sin -1 ] – арксинус или обратный синус, arcsin или 1/sin
- [deg] – перевод угла в градусах, минутах и секундах в десятичные доли градуса, подробнее
- [cosh -1 ] — обратный гиперболический косинус
- [cos -1 ] – аркосинус или обрат. косинус arccos или 1/cos
- [2*Pi] – рассчитывает число Пи, помноженное на два
- [tanh -1 ] – обрат. гиперболический тангенс
- [tan -1 ] – арктангенс или обратный тангенс, arctg
Как пользоваться MR MC M+ M- MS
Как пользоваться инженерным калькулятором – на примерах
Как возвести в степень
Чтобы возвести, к примеру, 12^3 вводите в следующей последовательности:
12 [x y ] 3 [=]
12, клавиша «икс в степени игрик» [xy], 3, знак равенства [=]
Как найти корень кубический
Допустим, что мы извлекаем корень кубический из 729, нажмите в таком порядке:
729 [3√x] [=]
729, [ 3 √x] «кубический корень из икс», равенства [=]
Как найти корень на калькуляторе
Задача: Найти квадратный корень 36.
Решение: всё просто, нажимаем так:
36 [ y √x] 2 [=]
36, [ y √x] «корень из икса, в степени игрик», нужную нам степень 2, равно [=]
При помощи этой функции вы можете найти корень в любой степени, не только квадратный.
Как возвести в квадрат
Для возведения в квадрат онлайн вычислительная программа содержит две функции:
[x y ] «икс в степени игрик», [X 2 ] «икс в квадрате»
Последовательность ввода данных такая же, как и раньше – сначала исходную величину, затем «x^2» и знак равно, либо если не квадрат, а произвольное число, необходимо нажать функцию «x^y», затем указать необходимую степень и так же нажать знак «равно».
Например: 45 [x y ] 6 [=]
Ответ: сорок пять в шестой степ. равно 8303765625
Тригонометрический калькулятор онлайн — примеры
Как произвести онлайн расчет синусов и косинусов, тангенсов
Обратите внимание, что kalkpro.ru способен оперировать как градусами, так радианами и градами.
1 рад = 57,3°; 360° = 2π рад., 1 град = 0,9 градусов или 1 град = 0,015708 радиан.
Для включения того или иного режима измерения нажмите нужную кнопку:

где Deg – градусы, Rad – измерение в радианах, Grad — в градах. По умолчанию включен режим расчета в градусах.
В качестве самого простого примера найдем синус 90 градусов. Нажмите:
90 [sin] [=]
Также рассчитываются и другие тригонометрические функции, например, вычислим косинус 60 °:
60 [cos] [=]
Аналогичным способом вычисляются обратные тригонометрические функции онлайн на КАЛКПРО — арксинус , арккосинус, арктангенс, а также гиперболические функции sinh, cosh, tanh.
Для их ввода необходимо переключить интерфейс, нажав [Inv], появятся новые кнопки – asin, acos, atan. Порядок ввода данных прежний: сначала величину, затем символ нужной функции, будь то акрсинус или арккосинус.
Преобразование с кнопкой Dms и Deg на калькуляторе
[Deg] позволяет перевести угол из формата градусы, минуты и секунды в десятичные доли градуса для вычислений. [Dms] производит обратный перевод – в формат «градусы; минуты; секунды».
Например, угол 35 o 14 минут 04 секунды 53 десятые доли секунды переведем в десятые доли:
35,140453 [Deg] [=] 35,23459166666666666666
Переведем в прежний формат: 35,23459166666666666666 [Dms] [=] 35,140453
Десятичный логарифм онлайн
Десятичный логарифм на калькуляторе рассчитывается следующим образом, например, ищем log единицы по основанию 10, log10(1) или lg1:
1 [log] [=]
Получается 0 в итоге. Для подсчета lg100 нажмем так:
100 [log] [=]
Решение: два. Как себя проверить? Что вообще такое десятичный логарифм — log по основанию 10. В нашем примере 2 – это степень в которую необходимо ввести основание логарифма, то есть 10, чтобы получить 100.
Так же вычисляется натуральный логарифм, но кнопкой [ln].
Как пользоваться памятью на калькуляторе
Существующие кнопки памяти: M+, M-, MR, MS, MC.
Добавить данные в память программы, чтобы потом провести с ними дальнейшие вычисления поможет операция MS.
MR выведет вам на дисплей сохраненную в памяти информацию. MC удалит любые данные из памяти. M- вычтет число на онлайн дисплее из запомненного в памяти.
Пример. Внесем сто сорок пять в память программы:
145 [MR]
После проведения других вычислений нам внезапно понадобилось вернуть запомненное число на экран электронного калькулятора, нажимаем просто:
[MR]
На экране отобразится снова 145.
Потом мы снова считаем, считаем, а затем решили сложить, к примеру, 85 с запомненным 145, для этого нажимаем [M+], либо [M-] для вычитания 85 из запомненного 145. В первом случае по возвращению итогового числа из памяти кнопкой [MR] получится 230, а во втором, после нажатия [M-] и [MR] получится 60.
Инженерный калькулятор kalkpro.ru быстро и точно проведет сложные вычисления, значительно упрощая ваши задачи.
Перечень калькуляторов и функционал будет расширяться, просто добавьте сайт в закладки и расскажите друзьям!
В создании этой статьи участвовала наша опытная команда редакторов и исследователей, которые проверили ее на точность и полноту.
Команда контент-менеджеров wikiHow тщательно следит за работой редакторов, чтобы гарантировать соответствие каждой статьи нашим высоким стандартам качества.
Из этой статьи вы узнаете, как пользоваться основными функциями научного (инженерного) калькулятора. Научный калькулятор пригодится при изучении алгебры, геометрии и тригонометрии.
Найдите основные функции. На калькуляторе есть несколько функций, которые понадобятся для решения алгебраических, тригонометрических, геометрических и других задач. Найдите на калькуляторе следующие функции:
Инженерный вычисление, Логарифмы и антилогарифмы, Вычисления с дробями
Обращение угловых единиц
функцией. См.Пример 15.
(Примечание) :Даже если выполнение вычислений заканчивается
ошибкой, данная функция сохраняет текущие
® Использование режима СОМР для научных вычислений.
Логарифмы и Антилогарифмы
• Калькулятор может вычислять об
чные и натуральные
логарифмы и антилогарифмы, используя клавиши [ log ], [in],
^ ], и [ 2nd ] [ е ^ ]. См.Пример 16.
Вычисления с дробями
Дробные величины отображаются следующим образом:
(Примечание) : Величины автоматически выводятся на экран в
десятичном формате даже тогда когда общее
число знаков дробнойвеличины(челое +
числитель+знаменатель+знак деления )превышает
• Чтобы ввести смешанное число, введите целую часть, нажмите
], введите числитель, нажмите [ а ] и введите
знаменатель. Чтобы ввести неправильную дробь, введите
числитель, нажмите клавишу [ а ] и введите знаменатель.
• Нажатием клавиш [ 2nd ] [
]отображаемая величина будет
превращена в неправильную дробь, и наоборот. Нажмите
клавиши [ а ]. для конвертации между десятичными и
дробными результатами. См.Пример 18.
• Операции с величинами содержащими дроби и десятичные
дроби осуществляются в формате десятичных дробей. См.
■ Обращение угловых единиц
Нажатием клавиши [ MODE ] производится вывод на экран
меню для угловых единиц
тремя угловыми единицами :
Обращение углов (См.Пример
Измените установки углов по умолчанию на те,
которые вы хотите обратить.
Введите величину единицы для конвертации.
Нажмите клавишу [ DRG^ ] для вывода на дисплей меню.
источники:
http://planshet-info.ru/kompjutery/rabota-s-inzhenernym-kalkuljatorom
http://manualza.ru/citizen/sr-270/bklf11
Item Preview

10.jpg

11.jpg

12.jpg

13.jpg

14.jpg

15.jpg

16.jpg

17.jpg

18.jpg

19.jpg

20.jpg

21.jpg

22.jpg

23.jpg

6.jpg

7.jpg

8.jpg

9.jpg
121
Views
DOWNLOAD OPTIONS
Uploaded by
Xatar
on
SIMILAR ITEMS (based on metadata)
Regardless of whether you’re looking to do plain arithmetic or want to solve complex science and engineering problems, you can rely on a scientific calculator to help.
Getting acquainted with a scientific calculator’s functions can be challenging. Going through the manual is an option, but the instructions can sometimes seem needlessly convoluted.
Here’s an easy guide that will teach you how to use a scientific calculator in minutes.
Understanding what a scientific calculator is and its components will help you get the hang of using it quicker.
What is a Scientific Calculator?
A scientific calculator is a digital calculator loaded with several functions, enabling the user to solve complex science, engineering, and mathematics problems.
Basic and business calculators only allow you to do basic operations like addition, subtraction, multiplication, and division. In contrast, scientific calculators enable you to quickly carry out trigonometric functions, work with natural logarithms and square roots, and plot graphs.
Furthermore, the calculators also allow you to work with scientific notation and exponents. Unlike simple calculators, the order of operations rule is applied to all calculations you do on scientific calculators.
While these calculators come with a lot of added functionality, they are also priced considerably more than basic and business calculators.
Easiest Scientific Calculator to Use
You don’t always need to buy and use a scientific calculator to solve problems. Meta-Calculator.com is a web-based, free-to-use scientific calculator that comes loaded with all the features available in expensive graphing calculators.
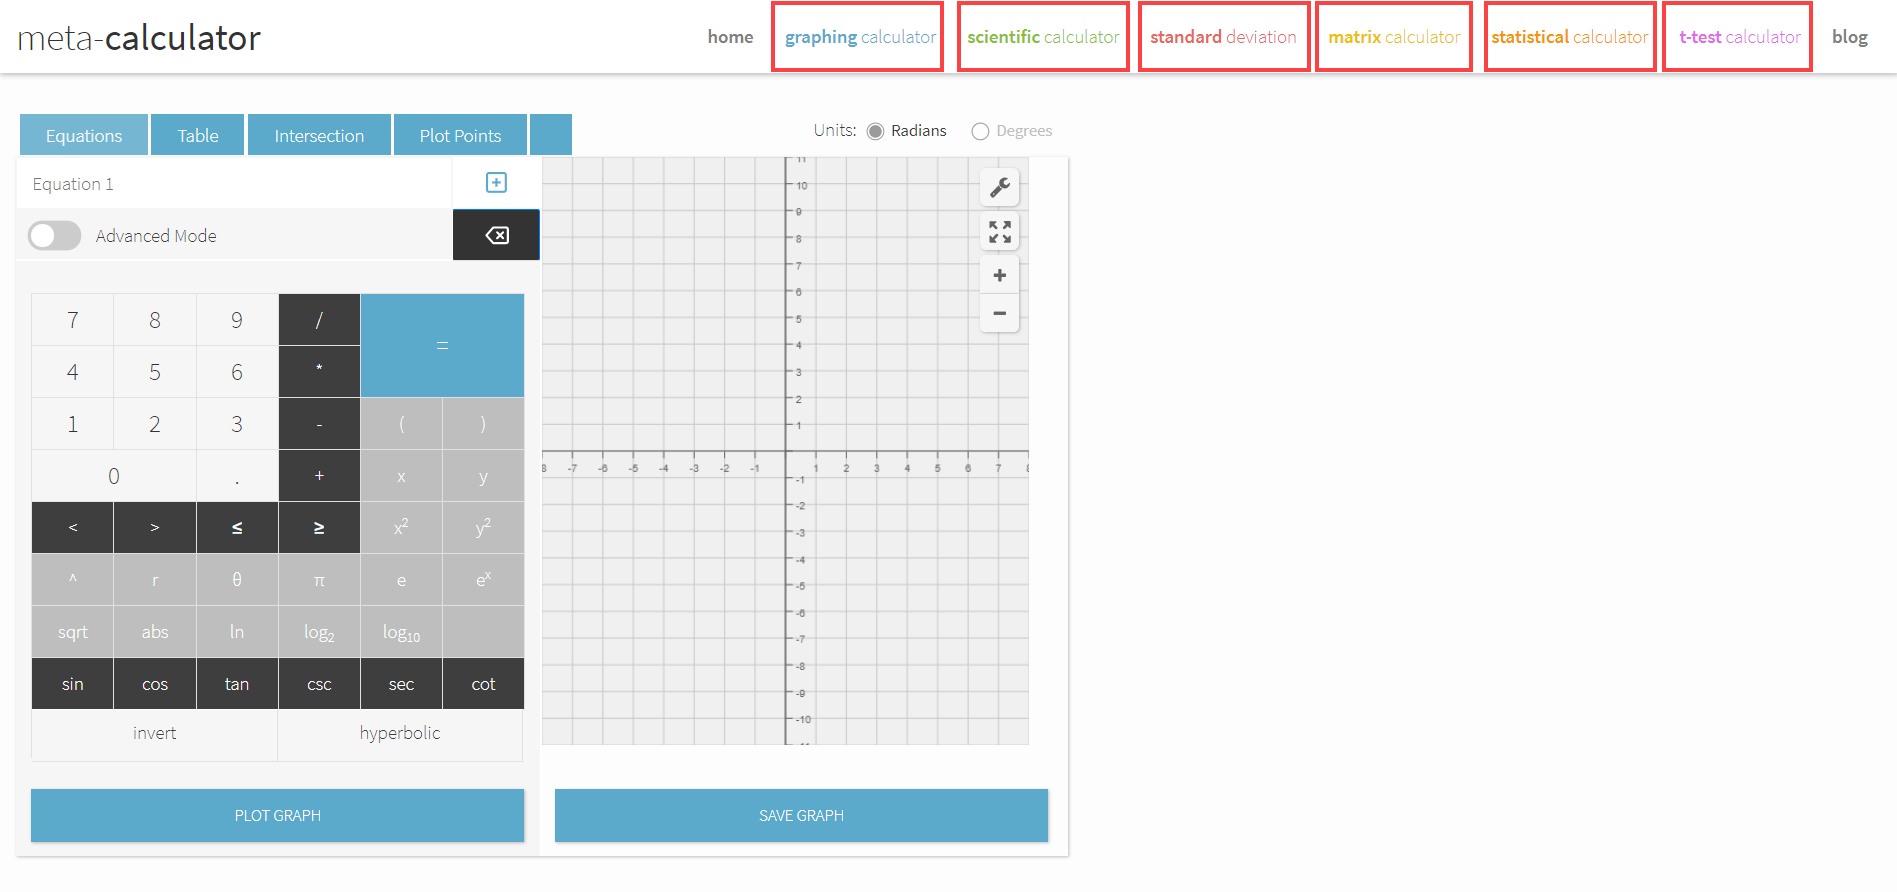
Besides enabling you to find standard deviations of data, it also allows you to do matrix calculations, carry out t-tests, and plot coordinates on graphs. You can use it on your phone, tablet, and computer.
Furthermore, you don’t need to use complex key sequences to access features like you would in a traditional scientific calculator. You can use the calculator to solve complex science and math problems with just your mouse.
What A Scientific Calculator Looks Like
The position of the keys on scientific calculators varies by make and model. That being said, most scientific calculators have a similar design and feature identical functions.
A typical scientific calculator looks like this:
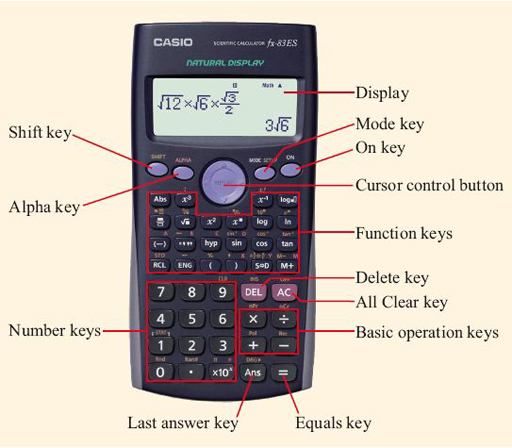
Casio FX-991EX
To use a scientific calculator, you must first switch it on by pressing the “ON” button, usually on the corner of the top row of keys on the calculator. When the calculator is turned on, a flashing cursor will appear on the calculator display.
You can then proceed to apply any of the several operations that your scientific calculator comes loaded with.
The Keys on A Scientific Calculator
The lower half of the typical scientific calculator features the number keys and the keys required to perform basic arithmetic. Besides the number keys, you will find the + – x and / keys.
You will also find the = key on the bottom row. It is the key you need to press to display the result of the expression you’ve entered.
We’re using the Casio FX-991EX for the purpose of this tutorial. Othe parenthesis keys are in the row above the number keys. Using parenthesis can help you feed in the exact expression you want to be worked out.
You must note that most keys on scientific calculators have more than one function. The primary function is stamped on the keys; the second function of the key is printed above the key.
You can use the function printed above any by pressing the SHIFT key before pressing it.
Some keys also have a third function, printed above the key in red font. These functions allow you to store calculated values in the device’s built-in memory. The values can be retrieved whenever required. We cover using the calculator’s memory in detail later in the post.
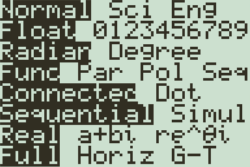
While keys provide access to most of the calculator’s features, some options can only be accessed via menus. For instance, the MODE menu may allow you to pick from several options:
Important Scientific Calculator Functions
In the following sections, we’ve highlighted all of the important scientific calculator functions and broken down how to use them.
Basic Calculations
To do basic calculations with your scientific calculator, you must enter the expressions in the exact order as you would write it on paper.
After entering your expression, pressing the = key will display the answer on the screen.
You can enter an expression that is too long for the screen to display. In this case, you can use the arrow keys to scroll left and right on the calculator.
Typing a long expression into the calculator will sometimes cause the shape of a cursor to change to a block. If you see the cursor change to a block, it means that your calculator only allows entering that many characters at a time. You will need to break up your expression for the calculator to solve it.
You can also enter negative numbers into the calculator by simply pressing the “-” key on the keyboard.
Making Corrections
Getting the hang of the position of the keys takes time, and making mistakes is common. You don’t have to type in the entire expression again if you make a mistake.
If you accidentally enter a wrong digit or symbol, you can use the arrow keys and the “DEL” key to remove the digit or symbol.
However, in some scenarios, it makes more sense to clear the entire expression. If you find yourself wanting to start over with feeding the expression into the calculator, press the “AC” button.
Sometimes, pressing the wrong key when entering an expression into the calculator can lead to a syntax error. Some calculators give you the option to “Quit” or “Clear Screen” directly, like so:

In other calculators, you will need to start over with entering the expression by pressing “AC” or using the arrow keys to fix the erroneous expression.
Working with Exponents
There are many ways of working with exponents on a scientific calculator. Most calculators come with x2 and x3 that you can use to work with powers. For instance, if you wanted to square three, you would press the “3” key and press the x2 button after.
You can also work with bigger exponents on a scientific calculator using the x∎ button. To use it, first, enter the base number (let’s say it’s 2) and then press the x∎ key.
A box will appear above the base number, which you can navigate to using the arrow keys. While navigating, when you see the exponent box with a flashing cursor (“|”), you can enter the exponent number in it.
Use your arrow keys to move your cursor away from the exponent box, enter more numbers, and add more operations to the calculation.
It is important to note that some scientific calculators have a “^” key instead of the x∎ key. The two have the same functionality, so you can use them in the same way. Some calculators do not have x2 and x3 keys, so you will need to use the ^ or x∎ key to work with exponents.
Working with Fractions
Working with fractions on a scientific calculator is as simple as pressing the “∎/∎” button. After entering the symbol, you can use the arrow keys to navigate the numerator and denominator positions and enter expressions.
The fraction template that appears will look like this:

After you fill in the numerator, pressing the down arrow key will move the cursor to the bottom of the template. You can enter the denominator here. You could then either press the = key to calculate the result. You could also hit the right arrow key, move out of the denominator, and input the rest of the calculation.
Some calculators do not have the “∎/∎” button, but it is possible to work with fractions on these calculators as well. You will need to use the parenthesis buttons to separate your fractions and get a result. For instance, to calculate 3/11 + 4/13 , you will need to enter (3/11) + (4/13) in the calculator.
Working with Scientific Notations
Using scientific notation enables you to work with numbers too large or too small to represent regularly. Every scientific calculator will automatically display a result in scientific notation if the result is greater than or equal to 1010.
The same logic applies to small numbers. If a result is too small, it will be represented in scientific notation. The calculator’s mode decides how small the number needs to be for being represented in scientific notation. You can find details about this in your calculator’s manual.
To enter scientific notations on your calculator, you can use the x 10x key. For instance, if you want to enter 2.37 x 10⁷ in your calculator, you must first enter 2.37, press the x 10x key, and then set the exponent to 7.
Finding Roots on Your Calculator
Just like there are keys on the calculator to enter exponents, there are also keys that enter roots. To calculate the square root of a number, press the “√∎” button, and then enter the number you want to calculate the root of.
Some calculators enable you to calculate the cube root of a number using the alternate function of the “√∎” button. If your calculator does not provide this alternate function, you can calculate higher roots using the “∎√∎” button on the calculator.
Pressing the button will make a template appear, and you must use the arrow keys in the same way you would with the fraction template and enter the desired numbers.
Finding Trigonometric Ratios
You can measure an angle in various units. You can work with degrees, radians, and grads on your scientific calculator.
If you want to calculate the trigonometric ratios in degrees, make sure that the calculator is set to use those units. You can determine what unit your calculator is set to by looking at the top portion of the display. For example, if you see a “D,” it’s set to degrees.
On the other hand, if you see an “R” or a “G,” the calculator is set to provide you results in radians and grads, respectively. To switch to the unit you prefer, you will need to access the MODE menu by pressing the “MODE” button.
You can use the arrow keys to highlight the unit you want to use and then hit the = button to exit.
To apply the cos, tan, or sine function, you must press the cos, tan, or sin button, respectively. The symbol will appear on the screen.
Next, you must feed the size of the angle into the calculator. You don’t need to close the parenthesis unless you are using the ratio as a part of a larger calculation. Pressing the = key will calculate the angle and display the results.
You can also determine inverse trigonometric values on your calculator by using the alternate functions of the sin, cos, and tan keys. The operations can be applied similarly to how standard trigonometric calculations are done.
Applying Logarithms
Calculating a logarithm to the base ten is as simple as pressing the log key and then entering the number that you want to calculate the log of. Pressing the = key will display the result.
You must note that, like with trigonometric functions, using the logarithm function will also open up a bracket. The bracket must be closed if you want to enter a longer calculation.
Scientific calculators make working with natural logarithms easy too. The “ln” key works just like the “log” key. All you have to do is press the button and then enter the number that you want to calculate the logarithm of. You will need to close the bracket that appears to enter an extended expression.
You must bear in mind that some calculators do not have an “ln” key and have a “log![]() ” key. To calculate the natural logarithm with this key, you must enter the Euler’s constant in the base of the template.
” key. To calculate the natural logarithm with this key, you must enter the Euler’s constant in the base of the template.
Storing Values in Calculator Memory
The memory built into a scientific calculator is one of its most useful features. Solutions to science and math problems can often be lengthy, and the ability to store values after calculating them make arriving at the final result easy.
Most scientific calculators have several memories. The “M” memory allows you to store one value in it, and the memory can be accessed by using the “M+” key.
Clearing Stored Values
Clearing any values stored in memory previously is a good idea before using the memory. The Casio FX-991EX requires you to press the shift button, followed by the nine key to access the “CLR” function. You must then press the “2” key to indicate memory and confirm with the = button. You can then return to the home screen pressing AC.
Using this key sequence will clear values in all of the memories of the calculator. If you’re using a different calculator, the key sequence to clear memory may be different. Going through your calculator’s manual is the best way to learn the right way of clearing the calculator’s memory.
Storing New Values
To store a result you’ve calculated in the “M” memory, press the SHIFT button, then RCL, and then M+. We are using the alternate function of the RCL key (called ‘STO,’ short for “store”).
After activating the store option, you must indicate to the calculator where the value must be stored. To store it in memory “M,” press the M+ button.
You can perform several operations with the value stored in memory “M.” To add the stored value to any expression, press the M+ button. To subtract the M value, press the SHIFT button and then the M+ button.
Inserting the letter “M” into any expression is as simple as pressing ALPHA and then the M+ button. This way, you can perform operations on the results you’ve already calculated with ease.
For example, you can square the value stored in the memory “M” by using the entering pressing ALPHA, then M+, and then hitting the x2 and = keys to complete the operation.
You can store values in the six other memories in the calculator, too. After activating the store function, all you need to do is press the ALPHA button and pick from the six alphabets you want to store the data in.
Conclusion
Now that you’ve gone through this guide, trying to apply some of the operations yourself is the best way to get the hang of using a scientific calculator.
After some practice, you will understand what buttons you need to press to perform which operations. You will also get a feel for the order in which you have to press keys to use different functions.
In only a few minutes of practice, you will be able to use the calculator to solve complex problems quickly.
We have various comprehensive calculators that you can use online for free. You can choose from t-test calculator, graphing, matrix, the standard deviation to statistics, and scientific calculators. Check it here.